|
|||||||||||
|
|
|||||||||||
|
|
|
Understanding .NET Security Actions
Last month’s discussion introduced the Principal of Least Privilege and demonstrated how administrators and programmers can work together to implement Code Access Security policy. We now continue this discussion by exploring the Security Actions within Code Access Security (CAS). From the programmer’s perspective the Security Actions represent the fundamental verbs or actions available to code to interact with Security Policy. If you understand these actions first, instead of trying to grasp all the different parts of the security system, it will be easier to disentangle the rest.
Code Access Security is Confusing
When a programmer confronts Code Access Security for the first time, they find a confusing amalgam of evidence, code permissions, identity permissions, policy, policy levels, classes, code groups and the like. The first impression is not comprehension, but a headache. Rather than confront all this at once, it is easier if you start by focusing on the Security Actions your code uses to interact with the security system. Then the Security Actions will be a flashlight to illuminate the rest of Code Access Security.
Programmer self-interest dictates starting with understanding Security Actions. One of the themes of this series of articles is that programmers and administrators have to work together for effective security policy. .NET programmers have to realize they have no choice; administrators have full control and can prevent your code from running. Therefore to maximize the odds that your code will run in a given environment you need to know how to use the Code Access Security’s Security Actions properly.
Do What I Mean Not What I Say
Unfortunately the names of these security actions do not always correspond to what they actually do. For example, last month’s article demonstrated how the Demand Security Action can be used both imperatively and declaratively. The .NET documentation for Demand says “you can declaratively or imperatively demand that callers of your code have a specific permission or set of permissions”. The various dictionary definitions for demand involve some sort of authoritative request for something. Usually when you make such a request you expect something to be given to you. Nothing of the sort happens here. Nothing about Security Policy changes as a result of a Demand. It merely checks to see if the executing code has certain rights to do certain things such as read from a file. If the code does not have these rights, you do not get those rights. All you get is a SecurityException. Nothing is very authoritative about that request. The Demand example, which we will discuss shortly, demonstrates this.
Most of the explanations of Security Actions categorize them by whether they are declarative or imperative, or how they modify the stack walk used by the Common Language Runtime when implementing Security Policy. While it is important to understand the underlying technology, it is better to categorize them according to the problems they attempt to solve, not the technology they are based on. The following table summarizes the Security Actions and what their uses are.
Uses For Security Action
Inquiring About the Code Permissions Your Code Has
There are two security actions that are essentially queries of the security policy: demand and link demand. Demand can be an imperative or declarative security action. A link demand is a declarative security action.
The first sample to examine is the Demand example. Make sure the sample is built, and the security policy is setup as described in the readme.doc that accompanies the sample code. Look at the file demand.cs in the Demand example. Note that we make a demand for the UIPermissionWindow.AllWindows permission in both the Main and Test methods. Run the sample, and then comment out the Demand in the Test method. If you run the sample again you get the same results. Now go to the SamplePS permission set and change the User Interface’s Window permission to “No windows” as described in the readme instructions. Run the Demand example. You get a SecurityException when the code attempts to put up the Message Box. Now uncomment out the Demand method. Now you get two SecurityExceptions, the first when Demand is called. Nothing about Security Policy changed whether or not the Demand call was made.
Did you notice that the Demand in the Main method never failed. The Common Language Runtime’s stack walk to check the permissions starts at the method above the current stack frame. In the Main method there is no such method, so the Demand never fails. Sometimes, for example in the constructor for a FileInfo object, the .NET Framework makes a Demand call for you, but this does not change the semantics of Demand.
The implications of this are significant for programming with Security. If other assemblies use your assembly you can never be absolutely sure that your code will be able to run, because you cannot guarantee that your callers will have the appropriate permissions even if your assembly does. The Demand Security Action gives you the ability to query the Security Policy to find if your code will work. This is especially useful if you create a System.Security.PermissionSet instance composed of several permissions, and do a Demand before you execute some code, and find that half way through you have to abort and cleanup.
LinkDemands check only the immediate caller for the correct permissions. This is done at JIT compilation, and hence usually happens only once, and does not prevent luring attacks. Link demands are particularly problematic (some would go so far as say they are evil); we will discuss this demand in detail in a subsequent article.
Providing Information For Security Policy Administrators Has Side Effects
RequestMinimum and RequestOptional were discussed in the last article. RequestMinimum does not cause any change to security policy. In minimum.cs the UIPermisssion’s AllWindows permission was requested:
[assembly:UIPermission(SecurityAction.RequestMinimum, Window = UIPermissionWindow.AllWindows)]
If you change the UIPermission in SamplePS Permission Set to “No Windows” the code fails to run. However, the name Request is potentially misleading. If you do not have the permission, your program will fail with a PolicyException before your code ever runs. RequestMinimum tells the system that you absolutely must have these permissions to run. If that is not the case you are better off not using a RequestMinimum. Check what permissions you have with a Demand, and take the appropriate recovery path in your code if you do not have the permissions.
RequestOptional is even trickier. The file optional.cs in the RequestOptional sample has two RequestOptional actions commented out:
//[assembly:UIPermission(SecurityAction.Request Optional, Window = UIPermissionWindow.AllWindows)] //[assembly:FileIOPermission(SecurityAction.Request Optional, All = @"c:\")]
If you run the program it works. Uncomment out one of the actions, and run the program. You cannot execute the action the other request refers to! Uncomment both. The program runs! Change one of the actions to a RequestMinimum, the program still runs. Request optional implicitly refuses all permissions that were not in a RequestMinimum or a RequestOptional. It is as if a RequestRefuse were entered for every other permission covered by your system’s Security Policy. No mere request this Security Action either. Note that the failure resulting from a RequestOptional, however, causes a SecurityException to be thrown when the action with the unavailable permission is requested. RequestOptional never implicitly refuses the Execution permission.
Restricting Permissions Your Code Has
Most of these Security Actions do what their names say they do. RequestRefuse, as discussed last month, specifies what permissions you do not want your code to have even if Security Policy would allow them. This can be used to minimize the possibility that your code could be misused in a hacker attack. In the RequestMinimum sample, if you changed to RequestMinimum to a RequestRefuse, the code would fail with a SecurityException even if your assembly had the User Interface permission.
With an imperative or declarative security action Deny you can refuse a permission that you have. In the Deny sample, even though the assembly has the User Interface permission to put up a Message Box, the following code causes the permission to be refused and the attempt to put up a Message Box fails.
UIPermission perm; perm=new UIPermission(UIPermissionWindow.AllWindows); perm.Deny();
Using the declarative or imperative version of the PermitOnly security action allows you to deny all permissions except the ones you want. In the PermitOnly sample the following code causes only the User Interface permission to apply to the assembly, there is an implicit refusal of the FileIO permission.
UIPermission perm; perm=new UIPermission(UIPermissionWindow.AllWindows); perm.PermitOnly();
The System.Security.PermissionSet is a collection of different permissions. Demand, Deny, or PermitOnly can be applied to all permissions in the collection.
The InheritanceDemand Security Action is a peculiar beast. It can be used to control the behavior of classes that derive from a base class, or override a virtual method of that class. The InheritanceDemand sample illustrates the first one. The Base class is decorated with an Inheritance Demand.
[UIPermission(SecurityAction.InheritanceDemand, Window = UIPermissionWindow.AllWindows)] public class Base
The class Derived inherits from Base. If the assembly that Derived lives in has the UIPermission the code will run. If you uncomment the RequestRefuse Security Action in that Assembly the code will no longer run because it fails the Inheritance Demand from the base class.
//[assembly:UIPermission(SecurityAction.RequestRefuse, Window = UIPermissionWindow.AllWindows)]
If you comment out the Inheritance Demand on the Base class, the code will work again. An Inheritance Demand placed on a virtual method in the base class will only allow derived classes to override this method if they live in assemblies that have the permission associated with the Inheritance Demand Security Action.
This security check is done during JIT compilation of the first use of the derived class. (You can check this in the Inheritance Demand sample by placing a breakpoint on the Test method and see where the SecurityException occurs.) Since this will usually occur only once, an InheritanceDemand can be used to prevent others from using a class that you cannot mark sealed or a method that cannot be marked final. Also, the name Demand makes sense if you look at demands as Security Actions that make a stack walk. From the point of view of what the Security Action does it is counterintuitive, and the results are unlike the other Demand Security Actions.
Remember whether your code can execute depends on whether the assemblies that contain the code of your callers have the appropriate permissions. Hence, the Security Actions Deny and PermitOnly, just like the Demand Security Action, apply to the assemblies of the methods that are in the stack frame above you.
Stopping the Stack Walk
If code uses an Assert Security Action it tells the CLR to stop checking the Permissions of the assemblies on the stack frame above the Assert. This causes the CLR to trust every caller of your code. This is an extremely dangerous thing to do unless you know exactly what you are doing. Hence, we will discuss this Security Action in more detail in a subsequent article.
Just When You Think It is Safe to Enter the Water
When working with Security Actions there is one not well-documented feature that you have to be aware of. Run the APTCA sample. You should find that it will not run. Why? An assembly that does not have the FullTrust Permission Set cannot call an assembly with a strong name unless that assembly is marked with the AllowPartiallyTrustedCallersAttribute (APTCA). Why is this important? The standard .NET assemblies are strongly named. All assemblies that go into the Global Assembly Cache (GAC) must be strongly named.
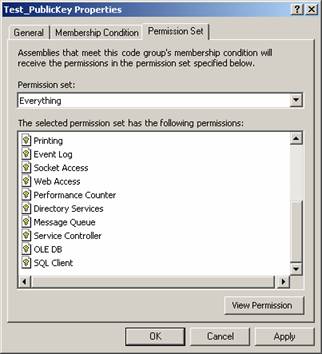
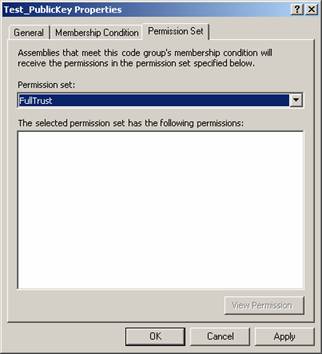
FullTrust means that the assembly is fully trusted to access all resources on the machine (i.e. any permission that implements the IUnrestrictedPermission interface). FullTrust is not the same as the Everything Permission Set. The Everything Permission Set has all the built-in permissions except SkipVerification.
Modify the Test_PublicKey Code Group to use the Everything Permission Set. Notice there is a list of all the permissions in the Everything Permission Set (Figure 1). In fact, you can go to that PermissionSet and add, remove, or modify the individual permissions. If you try to run the ATPCA sample it will still fail with a SecurityException. Now modify the Test_PublicKey Code Group to use the FullTrust Permission Set. Note it has no list of permissions and it is not modifiable (Figure 2). Run the sample and you find it now works.
In essence this seems to mean that CAS security is meaningless because only fully trusted code can use the .NET assemblies! This is particularly problematic because everyone has been told to only give the ability to call unmanaged code to those assemblies that absolutely need it. But that would make that assembly not fully trusted!
Modify the Test_PublicKey Code Group to use the SamplePS Permission Set again. In display.cs, uncomment out the AllowPartiallyTrustedCallers attribute.
//[assembly: AllowPartiallyTrustedCallers()]
The sample now runs. What are the implications of marking an assembly with the AllowPartiallyTrustedCallers attribute? It means you have code reviewed and tested your assembly, and are convinced that there are no known places where your code has security flaws. In a subsequent article we will discuss exactly what this means, and how to build such an assembly. This is critical if you want to put components into the GAC.
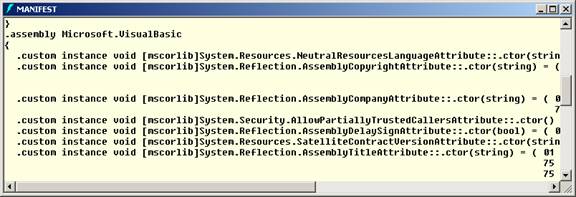
At the current time not all system assemblies are marked with the APTCA. Mscorlib, System.dll, System.Data.dll, System.Windows.Forms.dll, and System.Web.Services.dll are a few of the assemblies that are marked. You can use ILDASM to examine an assembly’s manifest to see if it is so marked. Figure 3 shows the APTCA attribute for the System.VisualBasic.dll assembly. Over time, as more of the System assemblies are reviewed they will be marked with APTCA.
If you ever make a call to a strongly named assembly and get a mysterious SecurityException, check to see if you have tripped over the APTCA issue.
Summary
By starting to think it terms of Security Actions you can begin to understand how your code interacts with the Security Policy defined by the administrators. You can query to find out what the state of policy is at any point in your code. This enables you to decide what code paths you want to take. Even if security policy trusts your assembly, you can restrict the permissions your code has if you are not fully convinced it is secure. You can provide information to the Security Policy administrators to help them decide if your assembly can run in their environment. You can also instruct the CLR to trust your callers. We have also pointed out to you the implications of full trust and strongly named assemblies as well as the implications of using the AllowPartiallyTrustedCallers attribute.
If you start to think in terms of how your code uses Security Actions, it will be easier to see how your code interacts with Security Policy. When that happens it will be easier to investigate and understand Security Policy because it will be tangible and concrete, not abstract concepts that seem to have no connection to reality.
And again, remember, develop your code as a user without administrator privileges.
Michael Stiefel is the principal of Reliable Software, Inc. where he does training and consulting in Microsoft technologies for companies ranging from startups to the Fortune 500. He is the co-author of “Application Development Using C# and .NET” published by Prentice-Hall. Go to www.reliablesoftware.com for more information about his development work and the training courses he offers. |
 |
|||||||||||||
| All Content (c) 2000 - 2014 Reliable Software, Inc. All rights reserved. | ||||||||||||||